Interpoint Graphics
Lynnette Taylor
For general interpoint information see Braille Formats Appendix E which covers which pages need to begin on the right-hand side. E.4 says that braille is not produced on the back of a graphics page. This is important because some graphics pages are inserted facing its related page.
Guidelines and Standards for Tactile Graphics contains the rules and guidelines for developing and using graphics. There isn’t much about interpoint since the only difference is the placement of the graphics pages. The graphics themselves are identical in single-sided and interpoint braille.
Following are two places where interpoint is mentioned. Generally, the first is true for both single-sided and interpoint graphics, however it is not true for graphics with multi-page keys.
5.8.3.2 Keys are displayed facing the page to which the key is related.
This second statement is true of any interpoint volume. The pages are numbered both on the front and the back. The page numbers on the back of the graphic are omitted and the page numbers on the front of the graphic are in the standard upper and lower right sides.
5.12.1 Print page numbers are assigned to each braille page, front and back. They may be implied page numbers.
Proofread the graphic just like the text of the book. Make sure the labels are accurate and right side up. Make sure they are in the appropriate place.

On this page is an illustration showing a single graphic in an interpoint volume. The reason that a34 is blank is because that is the page the graphic would go on it the braille were single-sided. However, in interpoint, graphics cannot go on the left-hand page. c34 is also blank because braille cannot go on the back of a graphic.
A page numbering choice often used in interpoint is to omit the braille page number on print page a34. It is an agency decision but the page number is implied and not skipped.
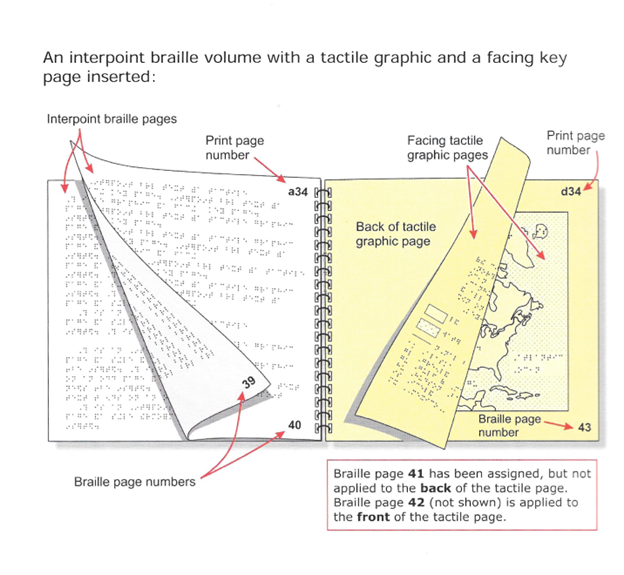
In this case there is a key and a graphic. Not only maps require keys, so do other things such as anatomy.
The key has to face its related graphic, therefore the holes for binding are on the right side instead of the left. The back of the key (b34) is blank, the back of the graphic is blank (e34). The next braille with text would be braille page 45.
The print and braille page numbers on the key page are on the right side of the page, which is toward the center of the volume. If the page numbers are not on the master graphic the page numbers can be placed on the thermoform page using the braille writer or the slate and stylus must be used.
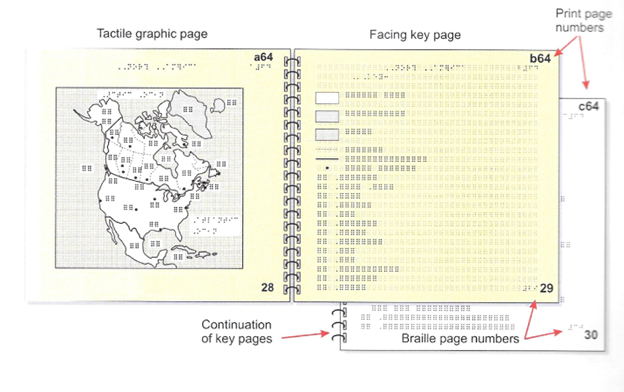
When a graphic has multiple pages of keys, the graphic in inserted first and then the keys are inserted. [Don’t ask me why, I don’t know.] The graphic is inserted facing the first page of the key.
All of the rest of the information about interpoint graphics remains the same.
How to Emboss and Omit the Graphics Pages in B2000
The first thing you have to do is to mark all the graphics pages. On the page that will house the graphic do the following:
1. Put your cursor on the page2. If you find it helpful, braille in a phrase or two to identify the graphic that will go on that page
3. Click on Do
4. Click on Drawing Space
5. Click on Page left
6. Click on Ok
You will get a little yellow square that will number the graphic.
Embossing
1. Click on Emboss2. Click on Selected Pages
3. Click on by Page property
4. Click on Select
5. Click on Any
6. Click on Pages without drawing space
7. Select by Page Property
8. Click on Process the page list now
9. Click on Okay
This will emboss only the pages that are just text. If you have a number of graphics pages, this will save you braille paper. And if you have correctly put page numbers, both print and braille, on your graphic they are easy to slide into the volume and be bound.
Remember that if you have a lot of thermoform pages you may need to cut the size of your volume as they take up more room that a regular braille page.
Back to Skills Articles